|
|
Drive tested with this solution was a ST3500320AS with firmware SD15 and worked perfectly using all of the steps provided below.
FIRST, PAY ATTENTION TO UPPER AND LOWER CASE WHEN TYPING THINGS INTO HYPERTERMINAL!!!!!!!!
Step 1: Remove the PCB (circuit board on the drive), take note of where the PCB makes contact with the actual hard drive. Leave the motor contacts connected, and put something like a business card or piece of thick paper between PCB and hard drive where the other connector is. Replace all the screws you can, and snug down at lease a couple of them furthest away from where the business card is stuffed in there.
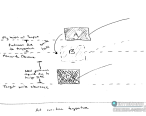
Step 2: Connect the RX, TX, and GND wires from your custom fabricated cable to the drive. I used a CA-42 cell phone cable and it worked perfectly. (Note that the RX as listed on your cable goes to the TX on the Hard Drive, and the TX as listed on your cable goes to the RX on the Hard Drive).
I Purchased mine from eBay seller "edirect" for $5.35 and took 1 week to arrive. I recommend purchasing a cable you know works such as this one. The large plastic end comes off very easily and is clearly labeled on the circuit board which wire is which.
Here's the pin arrangement on the drive - remember to hook up the RX and TX "backwards" or you will not be able to talk to the drive.
Step 3: Plug the SATA power cable into the drive, and wait until drive motor stops.
Step 4: Open Hyperterminal, when prompted choose the COM port that your cable is using. If you are unsure of which COM port to use, check your device manager (look in the "ports" sub-section) to see which COM port your cable is using. Choose 38400, 8, None, 1, None in the COM properties box that should pop up. If you hit "OK" and you get no errors, you should be in.
Step 5: Type ctrl+z and you should see a prompt that says F3 T>
Step 6: Type /2 and press enter. It should say F3 2>
Step 7: Type Z and press enter. It should say "Spin Down Complete, Elapsed Time 0.146 msecs", the elapsed time may not be the same - that's OK.
Step 8: Remove business card and mount the PCB as normal, tighten up all the screws.
Step 9: Type U and press enter. It should say "Spin Up Complete, Elapsed Time 6.864 secs". Again, the elapsed time may not be the same and that's OK.
This next part is not necessary, it's just checking that everything is OK. Use this when the first try fails (command F712 works only on 500 GB 7200.11 drives with firmware SD15, if this isn't your Firmware version just skip this part.)
Type / and press enter. It should say F3 T>
Type F712 and press enter. It should say.....
Byte:0712: RealTimeUpdatedFlags = 00 00
Byte:0712: Bit:0, HPA_SET_BY_SETMAX = 0
Byte:0712: Bit:1, HPA_SET_BY_SETMAX_EXT = 0
Byte:0712: Bit:2, DCO_SET_ACTIVE = 0
Byte:0712: Bit:3, CONGEN_READ_FROM_MEDIA = 0 <- configuration not loaded from surface
Type F,,22 and press enter. It should say Drive Configuration restored to defaults.
Type F712 and press enter. It should say.....
Byte:0712: RealTimeUpdatedFlags = 08 00
Byte:0712: Bit:0, HPA_SET_BY_SETMAX = 0
Byte:0712: Bit:1, HPA_SET_BY_SETMAX_EXT = 0
Byte:0712: Bit:2, DCO_SET_ACTIVE = 0
Byte:0712: Bit:3, CONGEN_READ_FROM_MEDIA = 1 <- done
(This is the end of the part that was not necessary unless the first try failed).
Step 10: You should see F3 T> at this point, type /1 and press enter. It should say F3 1>
Step 11: Type N1 and press enter. It should say F3 1>
Step 12: Type / and press enter. It should say F3 T>
***edit***
A fellow member with SD15 firmware sent me this message and I thought it should be added in case you guys are having problems. I didn't need to do the following step that is in italics but apparently some people have trouble unless they do this....
before you type the command m22,0,0,0,0,22 you need to disconnect power and reconnect.. wait about 10-20 seconds then enter that command or else it will not work.
***edit***
Step 13: Type m0,2,2,0,0,0,0,22 and press enter. (Note the "m" is lower case and the 0's are zeros). It should say.....
Max Wr Retries = 00, Max Rd Retries = 00, Max ECC T-Level = 00, Max Certify Rewrite Retries = 0000
User Partition Format 5% complete, Zone 00, Pass 00, LBA 00008DED, ErrCode 00000080, Elapsed Time 0 mins 05 secs
User Partition Format Successful - Elapsed Time 0 mins 05 secs
And should bring you back to the F3 T> Prompt.
Step 14: Unplug the SATA power cable from your drive, unhook the RX, TX, and GND wires. Turn off computer and re-install your drive. Everything *should* be working fine. Be sure to update your drive with the latest firmware as soon as possible. |
本帖子中包含更多资源
您需要 登录 才可以下载或查看,没有账号?立即注册

x
|


 狗仔卡
狗仔卡

 提升卡
提升卡 置顶卡
置顶卡 喧嚣卡
喧嚣卡 变色卡
变色卡 显身卡
显身卡


 评论:语心的所谓硬盘界学术打假,顺便浅谈
 WDC WD3200AAJS-65M0A0
 硬盘坏道维修色块全去! 希捷F3去色块又一
 希捷硬盘固件更新工具 支持SAS/SATA 64位
 文件删除数据恢复软件免费的有吗?大厂免费
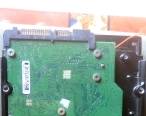 希捷10代盘刷死ROM电机不转不进F级和T级短
 Easy Tools SM2258XT固态硬盘工具 数据恢复
 TREX 工厂级维修 12分钟一片盘
 西部数据硬盘各ROM模块及01模块主要字节含
 日立HUGO专修软件